I probably need to start by setting the record straight: spies never buy those cardboard pies that Grandma supposedly made, with the cute little old lady in spectacles on the front of the box. Nor do we make pumpkin pie with frozen pastry.
Truly Awesome Pumpkin Pie -- or any pie, for that matter -- can be made only from scratch. If you're ever dropped onto the side of a mountain behind enemy lines, believe me, there are no stores that sell that kind of stuff. The local guerrillas have burned them all down. So the capable spy must know the basics. Otherwise, how is he (or she) going to cook up a delicious dessert for those guerrillas? As the old saying goes, "Life is uncertain; eat dessert first." But it better be a good one or life can get a whole lot more uncertain real quick.
Besides, have you ever read the ingredient list on the back of that prepared pastry junk from the store? It's always in yellow ink on a brown panel so that you need a 4x magnifying lens and halogen lights to read the thing. In other words,
they don't want you to know what's in it. And if you
do take the time to read the label, you'll discover many of those chemicals have been banned by the EPA. The rest are byproducts of nuclear reactors. Why else would they use chemical names no one can pronounce? What happened to plain ol' butter and flour?
Thankfully, the Gourmet Spy has come to the rescue with an easy all-natural truly Awesome Pumpkin Pie recipe that is sure to please any guerrilla. And the crust uses only the good stuff: plain ol' butter and flour, plus a bit of hot water. And it's really easy to make. No food processor required. So when I say easy, I mean EASY. Trust me, I tell lies for a living.
For the crust, here's all you need:
1/2 cup (125g) butter
1/2 cup (250ml) boiling water
1 1/2 cups plain wholewheat flour (use half or all self-raising flour if you like puffier pastry)
For a sweeter pastry, add 2 Tb raw sugar
Here's what to do:
Drop your butter into a mixing bowl and pour the boiling water over it. Once the butter is melted, add your flour and mix well. Done. (See, I wasn't lying; that was easy. Ha, ha -- first time for everything!)
Cover the bowl with a plate and set aside for about 10-15 minutes. Some people like to refrigerate the dough. I don't like working with really stiff dough, so I don't. But you'll need to let the warm dough rest and cool for a few minutes. Otherwise, when you roll it out, it can break and fragment easily. Allowing it to rest 10-15 minutes causes the gluten in the flour to become more elastic, meaning the dough will not break so easily.
When you're ready to roll out your dough, first spread a sheet of cling wrap on the counter and dust with flour. Take two-thirds of the dough, dust lightly with flour and roll out flat on the cling wrap to a thickness of about 1/8 inch (3 mm). Be sure to roll it about an inch larger than the circumference of the top of your pie dish.
Invert pie dish on the dough, then lift the dough and dish from beneath the cling wrap and flip everything so the dough settles down into the dish. Peel away cling wrap and gently lift and tamp edges of the dough down into the dish. Trim edges, return excess to other dough and work in well, then repeat procedure for top crust (if you've decided to make a double-crust fruit pie instead of pumpkin. Otherwise, wrap the remaining dough in cling wrap and freeze).
But if you're making our truly Awesome Guerrilla Pumpkin Pie, you'll need to bake the crust prior to adding your pumpkin puree. This is to prevent the pie crust from becoming soggy from all the moisture in the puree.
To do that, you'll need some dried beans, like white navy beans. We keep a small bag of them in the pantry for this very purpose. You can use them again and again. The added weight of the beans is to keep the pastry from bubbling during the baking process.

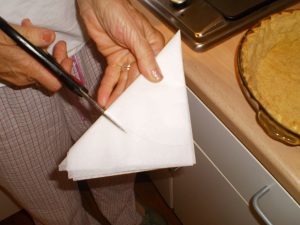
First tear off a sheet of baking paper and fold in half, then half again, then half again (into eighths). You will end up with a pointed piece of baking paper. Gently lay the folded paper in your pie dish with the pointed end at the center. Make a mark on both edges of the paper that corresponds to the upper edge of the pie dish. Take out and draw an arced line between those points, then cut with scissors and discard outer edge. Unfold and lay the remaining disk of baking paper in bottom of pie dish. Gently pour in your 1 cup of dried beans and slide the pie plate into 350F (180C) oven for about 20-25 minutes. The baking paper keeps the beans from making dents in the dough. When the crust is brown, remove pie dish to a wire rack. Allow to cool for 10 minutes, then lift baking paper and beans out so the crust can cool completely.
For our pumpkin pie recipe, we use butternut squash. Forget the canned pumpkin, which has almost replaced pumpkins themselves when it comes to making pies. Making your own pumpkin pie filling is not only easy and satisfying, but a lot more flavorful because we're roasting the pumpkin first, which intensifies the flavor. So c'mon, give it a try. Live on the edge.
Here's what you do:
Choose a medium-sized butternut squash (I will use the terms "squash" and "pumpkin" interchangeably here) that's about the same size at each end (even if it's stubby and short). If you buy one that has a bulbous/fat bottom, there will be a large hollow inside, where the seeds are. Choosing one with a smaller bottom means less of a hollow and more meat. You will still have seeds, so when you cut the squash open, scoop out the seeds with a spoon and either discard or wash and clean stringy bits off, pat dry, then coat with oil and a bit of sea salt (and/or spice) and roast for 10-20 minutes (stirring every 5 minutes) until golden brown, at 275F (140C). They are delicious!
Once the butternut squash is seeded, cut into chunks smaller than your fist. I then cut the tough outer skin off my chunks, but you need not do this as the skin turns very soft when cooked. Toss all of the chunks into a small plastic vegetable bag (from the grocery store), douse with a little olive oil (1-2 TB), then tumble the chunks inside the bag to coat with oil. Spread chunks on a baking tray that has been lined with baking paper (makes cleanup a lot easier), and roast for 20-25 minutes at 375F (190C), until tender (pierce with a fork to check if they are tender). It will now be easy to scoop the squash meat out of the skin. Put pumpkin meat into a bowl and mash. For one pie, you will need 1 1/2 cups of mashed pumpkin.
To that add:
2 eggs, beaten
3/4 cups raw sugar
1/2 tsp sea salt
1 tsp ground cinnamon
1/2 tsp ground ginger
1/4 tsp ground cloves
1 1/2 cups low-fat evaporated milk
BTW, I like more spice in my pie, but the spice measurements above are a great starting point; I also like to add 1/2 tsp nutmeg.
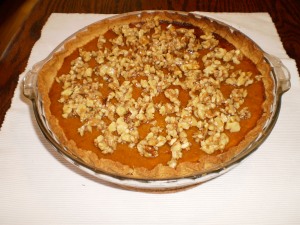
Combine ingredients into a mixing bowl and blend well (we use a "stick" blender and a tall carafe so the mixture is pureed well). Pour puree into the prebaked pie shell and bake in a preheated 425F (220C) oven for 15 minutes. Reduce temperature to 350F (180C) and bake an additional 40-50 minutes, or until a knife that's inserted near the center of the pie comes out clean. Cool and garnish with the following optional topping, if desired.
Optional topping:
1 cup chopped walnuts
2 Tb warmed honey
Mix well and spread over pie when it is cool
Enjoy!!!!!!!!!!!!!!!!!!!!!!!!
For my Isagenix pals, try making a pumpkin pie shake. Into a one-cup measure add 1/3 cup of ice, three chunks of roasted butternut, and 1/8 apple (cut in small pieces). Fill remainder of cup (which contains your ice, pumpkin and apple) with water and pour all of this into a blender (we use an Isablender; they are terrific). Add a 1 inch chunk of ripe banana, 1 tsp psyllium husk (added fiber), 1 tsp xylitol (optional in case you like it sweeter), 1 tsp cinnamon, 1 tsp ground nutmeg, 1 Tb Isapro (whey protein concentrate), 1 Tb chocolate Isalean shake, and 2 scoops vanilla Isalean shake. Blend well. This will make a thick mousse-like shake that you have to eat with a spoon.
I call this my Happy Holidays shake, not because I have this only at "the Holidays," but because every day can be a holiday -- a celebration of blessings and friendship and joy.
So Happy Holidays from the Gourmet Spy, no matter when you're reading this.


No comments:
Post a Comment